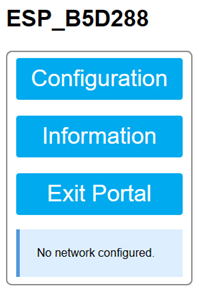
Now, we can configure the connection to the Wi-Fi access point:

Figure 5.8 – Configuration menu for the ESP Wi-Fi access point
Follow these steps:
Click on the Configuration button; you will see the configuration menu with the available Wi-Fi access points around you:

Figure 5.9 – Configuration form for the Wi-Fi access point
Type in the SSID and password of your Wi-Fi access point. If you have another Wi-Fi access point, you can enter up to two SSIDs. Click the Save button to save the configuration.
Now, the ESP32 microcontroller will restart and switch to station mode, attempting to connect to the access point SSID that you entered and saved. In the Serial Monitor of the Arduino IDE, you will receive the following messages:
FS File: wifi_cred.dat, size: 334B
[WM] RFC925 Hostname = AsyncESP32-FSWebServer
[WM] Set CORS Header to : Your Access-Control-Allow-Origin
ESP Self-Stored: SSID = Dheedee Home Main, Pass = xxxxxxxxxxxx
[WM] * Add SSID = Dheedee Home Main , PW = xxxxxxxxxxxx
Got ESP Self-Stored Credentials. Timeout 120s for Config Portal
[WM] LoadWiFiCfgFile
…
Custom Address:1
Voltage: 233.70V
Current: 0.56A
Power: 70.30W
Energy: 2072.798kWh
Frequency: 50.0Hz
PF: 0.62
0203.700.5670.302072.8050.000.62
These messages indicate that you have successfully set up the connection between the ESP32 microcontroller and the Wi-Fi access point, as well as read data from the PZWM004T sensor. Since the configuration settings are saved in the ESP32 microcontroller’s internal memory, the next time the ESP32 microcontroller boots, it will automatically connect to the configured Wi-Fi access point.
The sketch includes the ESP_Double_Reset_Detector feature within Async Wi-Fi Manager, which allows you to reset the access point connection by pressing the Reset button on the ESP32 microcontroller. To perform a double reset, press the Reset button twice within 10 seconds. After performing the double reset, the ESP32 microcontroller will return to the initial stage, allowing you to set up the Wi-Fi credentials again if you need to connect to another Wi-Fi access point.
Now, you can monitor the results of the energy monitoring system we just built by connecting to the local web server from the ESP32 microcontroller. To obtain the ESP32 microcontroller’s IP address, check the Serial Monitor messages, as shown in the preceding code. In this case, the IP address is 192.168.18.98. Since the sketch creates a local web server to display the results, type http://192.168.18.98 in the web browser of your phone or computer, which should be connected to the same Wi-Fi network. The result will be displayed:

Figure 5.10 – Energy monitoring station – user interface output
Since the sketch also implements the mDNS library, you can use a name instead of an IP address to access the same result by typing http://enermo.local in your web browser.
mDNS is a protocol that enables the resolution of locally defined names to IP addresses without the need for dedicated infrastructure such as a DNS server. With mDNS, we can use a name instead of an IP in the URL to access the browser, and it will resolve the name to the corresponding IP address.
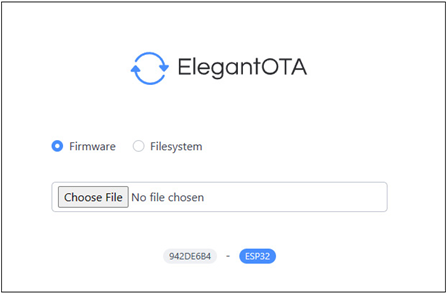
The enermo.ino sketch also implements AsyncElegantOTA, which allows you to send code updates over the air. After initially downloading the code that includes AsyncElegantOTA, you can send subsequent code updates through the web server by typing http://enermo.local/update in your browser. You will see something similar to the following:

Figure 5.11 – ElegentOTA file upload menu
Before we can choose the file we wish to upload, we need to generate the file from the Arduino IDE. Go to Sketch | Export Compiled Binary.
Once the process is complete, go to the Elegant OTA screen and click on the Choose File button. Navigate to the directory where your enermo.ino sketch is located.
Inside that directory, you will find a build directory. Click on the build directory; inside it, you will find another directory named esp32.esp32.node32s. Click on that directory; you will find several binary files inside.
Select the Enermo.ino.bin file and click Open. ElegantOTA will now upload the file and display an OTA success message. This indicates that the compiled code has been successfully uploaded to the ESP32 microcontroller via the Wi-Fi connection.
And with that, you have a working energy monitoring system! Have a look at the inputs and outputs that are involved, and play around with the parameters.
As always, feel free to look at the documentation for all the hardware and software involved in this practical.
Summary
In this chapter, we learned about the characteristics of WSNs and how we can architect them while incorporating best practices and considerations for ensuring that they can be well positioned to handle the different unique challenges that are posed by their setup compared to other networks, alongside the environment that they are deployed in. We learned more about commonly used APIs within protocol communication with IoT, such as the REST API. Then, we learned how to evaluate WSNs through metrics and understood the different models that can contribute to saving on power consumption within these systems. We took a deeper look into all this by getting hands-on and building our own WSN. We did this by creating a smart energy monitoring and management system based on what we have learned and applying Blynk as an associated IoT platform.
In the next chapter, we will further our understanding of network building by discussing building networks on the edge.
Further reading
For more information about what was covered in this chapter, please refer to the following links:
Learn more on popular APIs to use with IoT systems: https://dzone.com/articles/popular-apis-for-the-internet-of-things-iot-system
Explore more on Blynk’s capabilities: https://blynk.io/
Explore managing wireless sensor networks with the REST API: https://www-worldscientific-com.ezproxy.library.wisc.edu/doi/10.1142/9789814730464_0011
Gain more of an understanding on wireless sensor networks: https://imos.org.au/facilities/wirelesssensornetworks
Look at an AWS case study on a sensor network: https://aws.amazon.com/solutions/case-studies/sensornetworks/

